Saturday, May 23, 2009

Fresh Baked Boules


Of all the man made creations, there are few that rival bread. This category encompasses everything from the baguette to wonder bread. A miracle of nature, wild yeast propagated mixtures of flour and water for thousands of years, leaving superstitious bakers to wonder which God let their bread rise. Although I will be doing a post on using wild yeasts to leaven your bread soon, let's start with perhaps the simplest loaf you can make: a rustic boule with no kneading involved. Think about it: commercial mixers have been around for scant a century, and people have been making bread for several millenniums. Sure, people needed bread, but often they just allowed the bread to sit and naturally develop gluten through long slow rises, producing a chewy and slightly sour flavor that is perfect on its own.


In a bowl mix:

-2 cups whole wheat flour and 1 cup AP flour (I suppose bread flour would be better but I don't have any)
-1/4 tsp instant AKA rapid rise yeast
-1 1/2 tsp salt

In a small bowl or large liquid measuring cup mix:

-1 1/4 cup warm water OR 3/4 cup warm water and 1/2 cup mild crappy lager beer (This is the Cooks Illustrated method, which is good, but I rarely have a beer like this open, and usually don't want to open one just to make bread. I have made it with the beer and didn't feel like it made that big a difference in the flavor but YMMV)
-a good squeeze of honey
-2-3 tablespoons white vinegar

Mix the wet into the dry until a shaggy ball appears and cover with plastic wrap and let sit 8-18 hours.

2. Lay 12- by 18-inch sheet of parchment paper inside 10-inch skillet and spray with nonstick cooking spray. Transfer dough to lightly floured work surface and knead 10 to 15 times. Shape dough into ball by pulling edges into middle. Transfer dough, seam-side down, to parchment-lined skillet and spray surface of dough with nonstick cooking spray. Cover loosely with plastic wrap and let rise at room temperature until dough has doubled in size and does not readily spring back when poked with finger, about 2 hours.

3. About 30 minutes before baking, adjust oven rack to lowest position, place 6- to 8-quart heavy-bottomed Dutch oven (with lid) on rack, and heat oven to 500 degrees. Lightly flour top of dough and, using razor blade or sharp knife, make one 6-inch-long, 1/2-inch-deep slit along top of dough. Carefully remove pot from oven and remove lid. Pick up dough by lifting parchment overhang and lower into pot (let any excess parchment hang over pot edge). Cover pot and place in oven. Reduce oven temperature to 425 degrees and bake covered for 30 minutes. Remove lid and continue to bake until loaf is deep brown and instant-read thermometer inserted into center registers 210 degrees, 20 to 30 minutes longer. Carefully remove bread from pot; transfer to wire rack and cool to room temperature, about 2 hours.


Good luck, once you get the hang of it, it's really easy! Also if you're intereted in slashing, the secret is right before you put it in the dutch oven, rub flour all over the top of the loaf THEN slash and that's how you'll get a great looking top.


Sunday, February 8, 2009

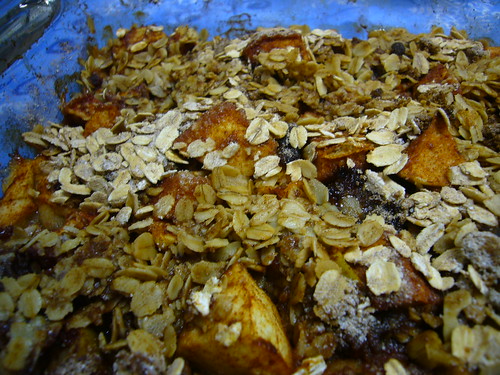
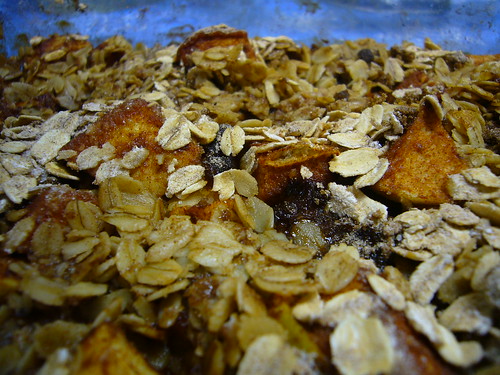
Heart-Healthy Apple Crisp


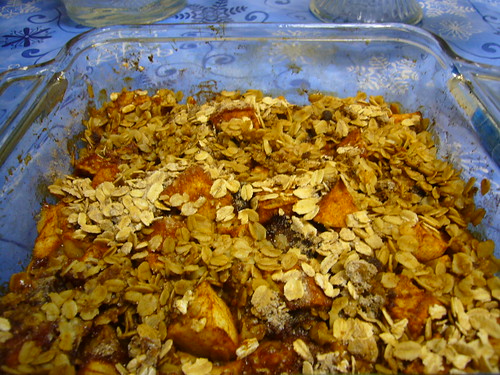
This is a basic, no-brainer, but it’s still worth writing about. Apple crisp! I love it—who doesn’t? It includes all my favorite ingredients: fresh fruit (I love me some tart Granny Smiths!), cinnamon and sugar. Plus, the whole wheat flour is good for your heart (yes, even when covered in sugar—yes it is!, trust me on this). I normally make this in the fall, when there’s an excess of Biglerville apples, but what’s wrong with a taste of fall in February? Nothing! In fact, it’s downright delicious!


Apple Crisp:

2 Granny Smith apples

3 Tbs. brown sugar

1 Tbs. white sugar

4 Tbs. whole-wheat flour

½ c. old-fashioned oats

2 Tbs. cinnamon (I really like cinnamon; if you don’t, it’s not a bad idea to curtail this otherwise unnecessary and maybe even unhealthy amount)

½ stick of butter


Peel and cut apples into chunks. Place in a greased 8x8 pan. Mix oats, flour and sugars in bowl. Cut butter into half-inch chunks. Place in mixture and combine. Spoon over apples. Bake at 350 degrees for 30 minutes or until apples are soft. Serve over vanilla ice-cream.


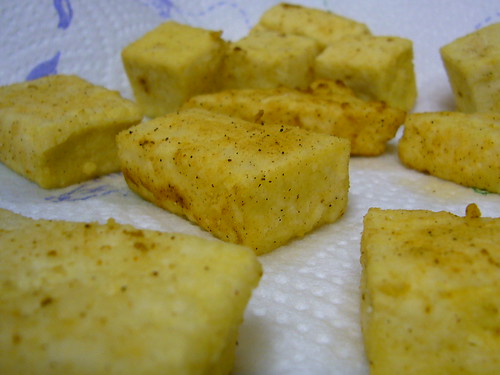
Chinese-Style Teriyaki Tofu and Broccoli Stir-Fry


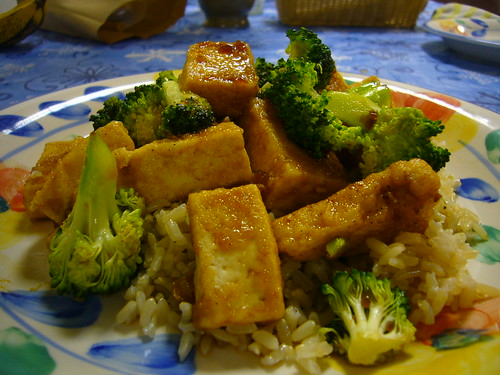
After nearly four years of strict vegetarianism, I cracked last fall while studying abroad in Aix-en-Provence, France. The poulet roti, the moules frites, the escargot: it was all too much for me. But after a year of binging on chicken wings, greasy turkey burgers and fried chicken (oh, why in the world are the meats I love so terrible for me?), I’m back on the wagon. Or, kind of. I have one foot hanging off the wagon? In any case, I’m trying to eliminate meat from my diet, and the easiest way to do this, in my opinion, is to open yourself to meals without meat. For me, this just means bringing back all the meals I used to make religiously. I loved them then, but when you replace tofu with chicken in stir -fries, or black beans with chicken in fajitas, it gets difficult to go back. But I’m doing it!


Tonight I made one of my old favorites: Chinese-style Teriyaki fried tofu with broccoli over brown rice. It’s healthy, it’s easy and it’s delicious. And, I have to admit, it made me remember how tasty vegetarianism really can be, even if it doesn’t involve buffalo sauce or char-grilled taste.


Chinese-Style Teriyaki Tofu and Brocolli:

1 pkg. extra-firm tofu

1 head of broccoli

½ c. brown rice

1 c. water

4 Tbs. flour

3 tsp. paprika

1 c. cooking oil (I use vegetable)

Teriyaki sauce (I’m a big fan of Soy Vay’s “Very Teriyaki,” seen here).

In a small pot, add water and bring to a boil. Add rice and cover, simmer for 40 minutes.


Meanwhile, cut broccoli into florets and open and drain tofu. Cover in paper towels and apply pressure. Discard wet paper towels and repeat. Cut tofu into thin chunks.


Heat oil in a separate pot on high. When hot, put tofu in flour and paprika mixture. Coat and place tofu in oil, one-by-one. Let each piece cook 30-45 seconds, remove and place on a paper-towel lined plate.


When all tofu is finished, put broccoli in a stir-fry pan and heat on high. Cook broccoli and add tofu. Add teriyaki sauce. Serve over rice.


Yum! Who knew vegetarianism could be so yummy? (Well, I did…four years ago…)

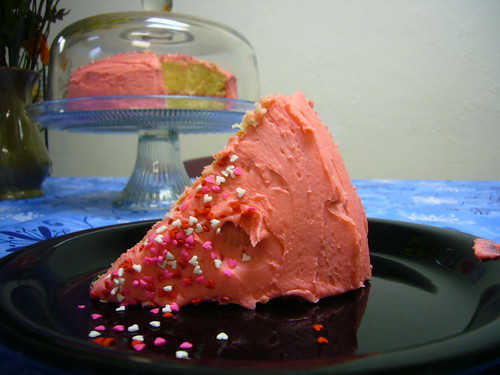
Valentine's Cake, Vegetarian Stirfry and Apple Crisp


Well, I was hopeful after my last post, in which I “caught up” on recent cooking adventures, that I’d post regularly, but again the life of a student, intern and devoted long-distance girlfriend have caught up with me! Nonetheless, I’m back and best of all, I spent the whole weekend in the kitchen. An early Valentine’s Day cake for my roommates on Friday, Chinese-style tofu and broccoli Teriyaki over brown rice on Saturday and a homemade apple crisp tonight! The jury is still out on the crisp, which will be broken into at my friend Lindsay’s during the 9pm showing of Bret Michaels Rock of Love show (what goes with white trash television better than apple crisp? You’ve got me…), but everything else has received raved reviews! And best of all, with Valentine’s Day, spring and Easter just around the corner, there’s lots more cute baking to come. But first, the Valentine’s Day cake!


Valentine’s Day Sweethearts Cake:

1 cup milk, room temperature

6 egg whites

1 tsp almond extract

1 tsp vanilla extract

2 1/4 cups cake flour

1 3/4 cups sugar

4 tsp baking powder

1 tsp salt

3/4 cup butter (6 oz), softened


Preheat oven to 350 F. Grease two 9-inch cake pans. In a small bowl, combine milk, eggs whites and extracts with a fork. Set aside.


Combine flour, sugar, baking powder and salt in an electric mixer and mix at slow speed with a paddle attachment. Add butter. Continue beating at slow speed until mixture looks like wet sand (if you're doing this by hand, sift the dry ingredients together and rub in butter). Add all but 1/2 cup of milk mixture and beat at medium speed for 1 1/2 minutes. Add remaining milk mixture and beat for an additional 30 seconds, scraping the sides of the bowl if necessary. Do not over-mix.


Divide batter evenly between prepared pans and gently shake to smooth batter. Bake 30-35 minutes, until toothpick inserted into the center comes out clean. Let cakes cool in the pans for 15 minutes then invert onto racks to cool completely before frosting.


(I frosted the cake with a simple buttercream, adding red food dye rather than milk.) The recipe is as follows:


Simple Buttercream Frosting:

6 cups confectioners’ sugar

16 Tbs. (2 sticks) unsalted butter, softened

4 1/2 Tbs. milk, plus more, if needed

2 tsp. vanilla extract

1/4 tsp. salt

Food coloring


In a bowl with an electric mixer fitted with the flat beater, combine the confectioners’ sugar, butter, the 4 1/2 Tbs. milk, the vanilla and salt and beat on low speed until combined, about 1 minute. Stop the mixer and scrape down the sides of the bowl. Increase the speed to medium and beat until fluffy, about 3 minutes. If the frosting is dry, add more milk, 1 tsp. at a time, until it is creamy but still holds peaks. Tint with food coloring as desired. Makes about 4 cups.


Enjoy!


Sunday, January 4, 2009

Fall 2008 Catch-Up!

Well, four months later and we're finally back. This past semester has been grueling for both Caleb and I---on top of our regular classes, we've been applying to graduate schools and maintaining our semester jobs. We were busy, but although our food blog that suffered, our stomachs didn't!. We may not have had time to blog about our cooking adventures, but we certainly made enough time for our tongues to get a taste of each endeavor!

In late October, we cheered on an eventual Obama victory with Obama-themed cookies (some with the Obama symbol and others with confetti, since we were confident about the outcome!). They were cute, but were eagerly feasted upon at our shared friend's Obama party on election night. Yes we can!

Add Video

Shortly thereafter, we attended the Biglerville Applefest, an annual tradition out here in Gettysburg, Pennsylvania. In addition to enjoying delicious homemade cider and pumpkin funnel cake (both of which were delicious!), we made our own caramel apples, dripping with hot caramel and roasted peanuts. Delicious!


During a dinner party in November, we also discovered the simple pizazz of Banana's Foster, a new favorite dish. What says "wow" like flames and liquor?


Finally, to cheer in Christmas and the month-long winter break we students wait so long for, Caleb and I baked Christmas cupcakes, each one individually and uniquely decorated:


Now that the busiest semester is over and winter break is drawing to a close, our New Years resolutions include just one thing: cook, cook, cook! And this semester, that'll mean blog, blog, blog.

See you soon!

Monday, August 25, 2008

End of Summer Meal

Had a few friends over an end of summer meal:

Hors D'Oeuvres: Brie and Fig Jam Crostini with Lavender, St. Marcellain Crostini


Amuse Bouche: Brunoised smoked salmon and shallots with creme fraiche, and lemon basil


Soup: Chilled watermelon soup with New Hampshire wild blueberries and chopped mint


Salad: Baby Arugula with Cherry tomatoes and italian aged cow's milk cheese with lemon vinaigrette


Main: Butterflied lemon rosemary chicken with roasted baby yukon gold potatoes


Desert: Blueberry crisp with vanilla ice cream

Saturday, August 9, 2008

Cupcakes That POP!


Alright folks, I hope you enjoy this post and take in every last moment, cause I can tell you, I am never making these suckers again! (That’s a lie. I very well may convince myself to make them again when someone else gets married, or has a baby, or another one of those life changing moments. But for now I am folding my arms across my chest and saying no way!)


I first saw these Cupcake Pops on the blog Bakerella, the author of which recently appeared on Martha Stewart making these (pretty cool!). I couldn’t get over how cute they were, and she made them for every occasion—she had Father’s Day cupcake pops, for-charity cupcake pops, and so on, so I thought, How hard could they be? Well, hard.


If you’re going to make these, I do suggest you have—in addition to the recipe’s ingredients—a whole lot of time and patience. These were two ingredients I usually have on hand, but this batch pushed my limits. First of all, the cake kept crumbling when I’d try to cover it in chocolate—whole bits of cake would fall off into the chocolate! In the end, I just held the cupcake and spooned the chocolate on and rubbed it around gently, but maybe you’ll have more luck.


Anyway, I made them for my brother’s fiancé’s bridal shower—I’m a bridesmaid and wanted to really contribute in the way that I best know how (baking!)—and was so glad I made them the night before; I would have gone nuts if I had tried to bake them on the same day, while helping my mom set up the house and getting myself ready. I suggest you do the same; give yourself plenty of time. On the flip side, they were a huge hit (I knew they would be). Everyone thought they were adorable, and although I didn’t think that mine turned out looking like mini cupcakes (like they’re supposed to), everyone else did. Best of all, they’re incredibly (and surprisingly) moist inside. You expect a hunk of chocolate or a dried cake, but it’s really gooey and soft inside. Yum! But as I told everyone, amidst their “mmm”s, enjoy them now, because I won’t be making them again! If you think you’re up to the challenge, here’s how you make ‘em:


Cupcake Pops and Cupcake Bites

1 13x9 baked cake

1 can cream cheese frosting (or about 2 cups equivalent from scratch)

1 flower shaped cookie cutter (1.25" wide X .75" tall)

1 package chocolate bark

1 package pink candy melts or white chocolate bark

Wax paper

Aluminum foil

Sprinkles, M&Ms

Lollipop sticks, plastic treat bags and ribbons


Serves: 50

Duration: 2 days


Bake a cake from a mix or from scratch in a 9x13 plan and cool completely. Crumble cake into a fine consistency into a large bowl. If the texture is too coarse, you can run it through a food processor. Add can of cream cheese frosting or homemade frosting and blend together using the back of a large spoon. Blend thoroughly. Roll mixture into 1.25" - 1.5" size balls and lay on wax paper covered cookie sheet. You may want to periodically rinse and dry your hands off in between. Cover with aluminum foil or plastic wrap and chill in refrigerator for several hours. You can speed this up by placing in the freezer for about 15 minutes.


Remove. Begin to shape into cupcakes using a small flower-shaped cookie cutter. To do this, take the chilled ball and roll it into more of an oval and then slide into cookie cutter. Push it into cutter until about half fills the cutter and the rest sticks out of the top in the shape of a mound. Then push the shaped cupcake carefully out of the cookie cutter from the bottom. Set right side up on a wax paper covered cookie sheet. Continue with remaining balls. Once shaped, cover and return to freezer. (5-10 minutes). You can also leave them covered in the refrigerator overnight if you want to do the dipping on the following day.


While cupcake shapes are chilling, begin to heat up your chocolate bark. Brown chocolate bark for the bottoms and pink (or whatever color you want) for the tops. Follow the instructions on the package for melting, but most recommend heating for 30 second intervals at a time and stirring in between. You can also do the double boiler method. When you are ready to dip, remove the cupcake balls from the freezer and set up another wax paper covered cookie sheet. Take the cupcake shaped mixture and dip bottoms into the melted chocolate, just to the point where the mounded shape starts. Remove from chocolate, turn upside down and wiggle so that the excess starts to slide down slightly. Then lay on the wax paper upside down. If you want them to be lollipops, then go ahead and insert the lollipop sticks while the chocolate is still wet. You can also leave some without the sticks; they’re just as cute as Cupcake Bites. If you’re not feeling confident about the support of the lollipop stick, dip the end of the stick in the melted chocolate before inserting into chocolate bottoms. Under no circumstances should you get water in the chocolate; make sure your hands are completely dry. Water will cause the chocolate to separate and mess up all your hard work. Dry completely. (15-20 minutes).


Once dry, melt and then dip the tops of the cupcakes in the pink or white chocolate.


You may need to move it around a little to cover all the exposed areas. Let the pink chocolate sit for a few minutes after heating to thicken; this will help it from dripping down the sides of the cupcake. Remove from the pink/white chocolate and turn right side up. You may need to hold and rotate it if there is any excess so that it doesn’t drip down too far. You can use a toothpick to help cover any areas the melted chocolate didn't cover. Then put each one in a Styrofoam block or, in my case, an Amazon.com box punched with holes. Let them dry.


For the Cupcake Bites, just turn right side up and rest on the wax paper. Then go ahead and put an M&M on the top and add sprinkles while wet. For the lollipops, continue holding and place an M&M on the top and add sprinkles. Let them dry in a Styrofoam block that you have already poked holes into (or, in my case, an Amazon.com box). When completely dry, cover the lollipops with small plastic treat bags and tie with a ribbon. You can store these in an airtight container and they will last for several days. You can also store in the refrigerator if you would like them cold.


I hope you enjoyed the grueling process much more than I did!